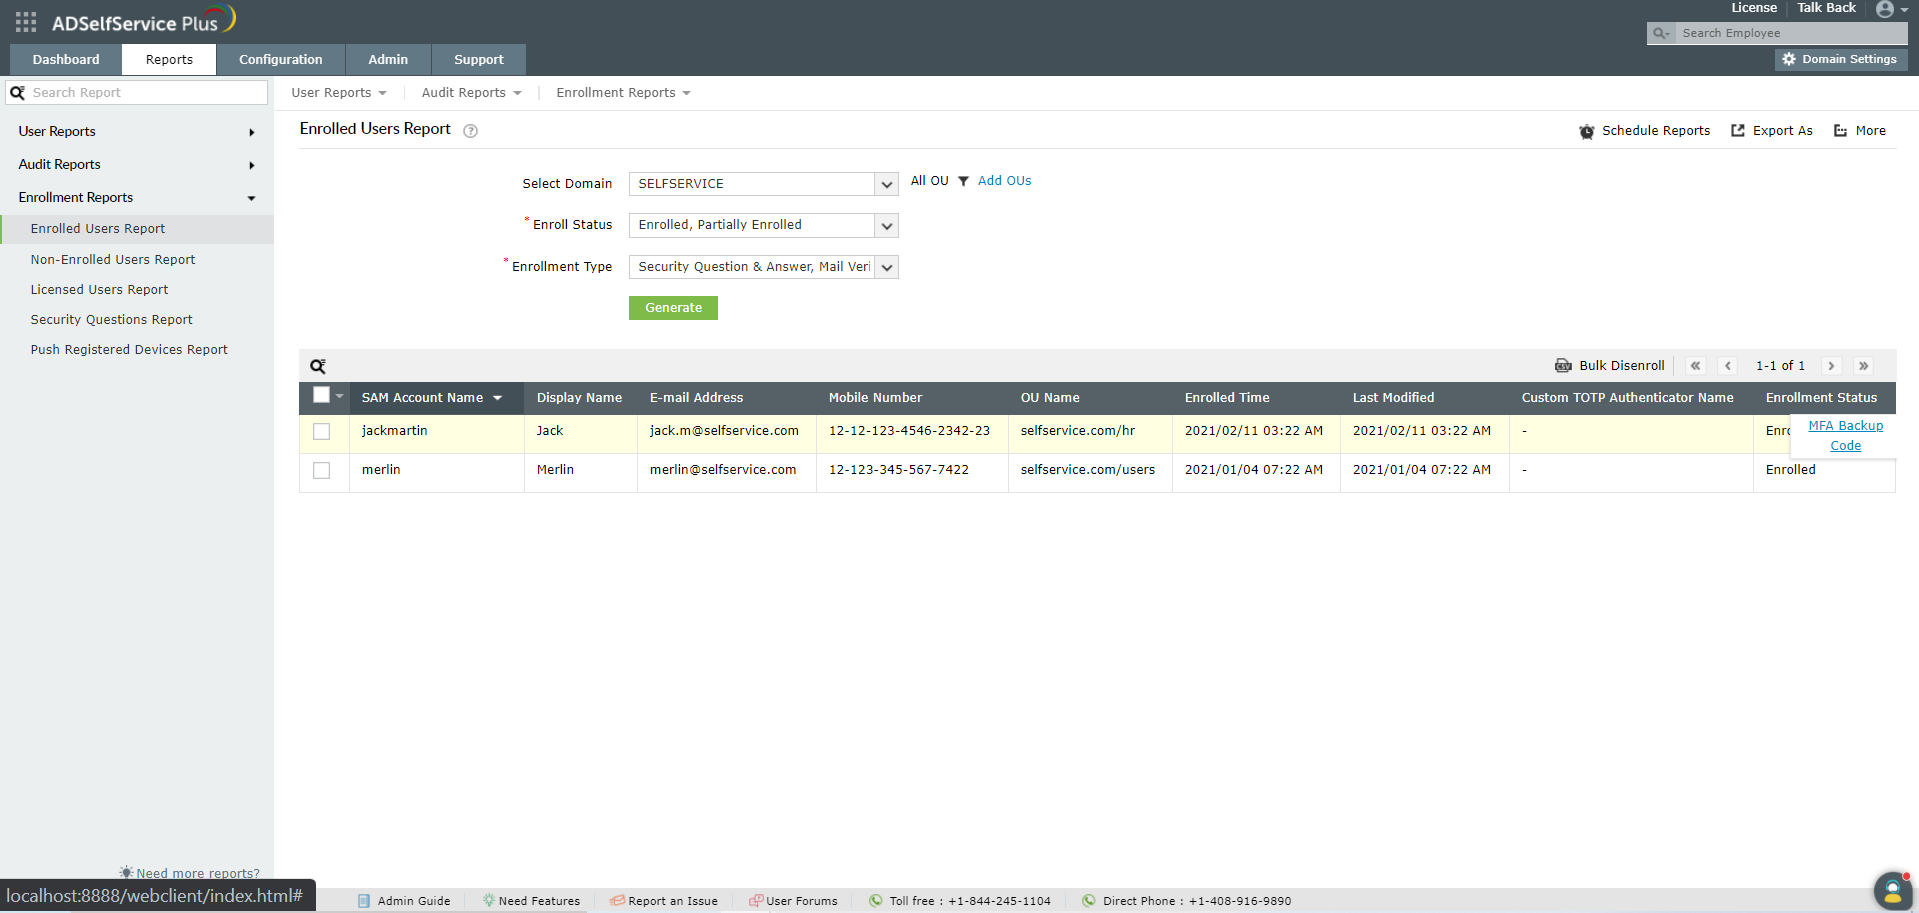
Enrolled Users Report :
The Enrolled Users report provides you with the list of users who have enrolled themselves in ADSelfService Plus. Enrollment provides users with access to the password reset and account unlock portal. It also protects the user accounts through the MFA methods the users have enrolled for. The report displays the users' mail addresses, users' mobile numbers, OU, the time of enrollment and the last time the enrollment was modified of the users.
Report filtering and generation :
-
Domain : Specify the domain using the Select Domain option
-
OU : Use the Add OUs option to specify OUs if necessary.
- Enrollment status : Use the Enroll Status drop-down to filters the entries based on whether the users are Enrolled or Partially Enrolled. Enrollment status is considered based on below conditions satisfaction. If all the below conditons are satisifed, then user's enrollment treated as Enrolled . If not , Partially enrolled.
-
Condition 1: User should have enrolled for all mandatory authenticators.
- Condition 2: User should have enrolled for required number of authenticators forced.
- Condition 3: If Security question is configured as authenticator, then User should have enrolled with all the mandatory questions and number of questions.
- Enrollment type : Filter the results based on the MFA methods using the Enrollment Type drop-down.
-
Then, click on Generate to generate the report.
Sorting :
Click on any of the columns to view the report's entries in ascending order or descending order.
Searching :
- Click on on the search icon [
 ] in order to search for specific data in the columns displayed.
-
Particular user can be searched using SAMAccount Name,Display Name, E-mail Address, Mobile Number and OU Name.
-
Searching will happen with criteria 'contains' . Ex. if user name is searched with word "jack" , then user name contains "jack" will be given as result.
Export and More :
- The Export As option in the right corder of the page helps export the report in various formats like CSV, CSVDE, HTML, PDF, XLS and XLSX.
-
The More option in the right corder of the page lists the Printable View, Send Mail, and Export Settings options.
- The Printable View option can be used to preview the report.
- The Send Mail option can be used to mail the report to the desired email addresses.
- The Export Settings option allows users to customize the description and logo that will be used in the exported report. Also, Admin can opt to keep logo in the every page of exported report.
Disenrolling the user
Disenrollment of the user is removing enrollment information completely from the ADSelfService Plus and they will not be able to perform self-service actions. The user must be enrolled again in order to be able to perform the actions.
Disenrollment of users' enrollment can be done in two ways :
- Manual : Choosing users whom you want to disenroll the by clicking available checkbox in the first column of each row and click Disenroll button next to search button.
- CSV : Click the Bulk Disenroll button in the right corner of the report header, nearer to navigation buttons. And upload CSV file which contains list SAM Account Name, Mobile Number or Mail ID, Secondary E-mail ID or Secondary Mobile number to disenroll users enrollment.

Customizing the report:
You can customize the report to include or exclude additional columns with information from AD attributes by clicking on the Add/Remove Columns icon at the far left of the navigation buttons.
Generating backup codes
Admins can generate a backup code for an enrolled user when the user's MFA device is not reachable or is lost. The user can use each backup code only once. To generate a backup code for a specific enrolled user:
- Go to the Enroll Status column and hover over the enrollment status entry of the specific user, the MFA Backup Code option will appear. Select this option.

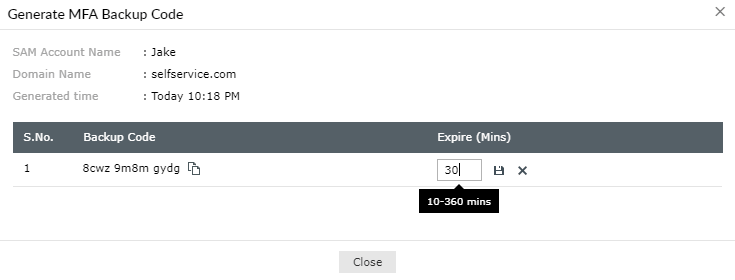
- The Generate MFA Backup Code section appears. Here the following details are displayed:
- SAM Account Name: The samAccountName value for the user.
- Domain Name: The domain to which the user belongs.
- Generated time: The date and time of the backup code generation.
- A table displays the newly generated one-time use backup code.
- Use the Expire (Mins) field to specify the number of minutes after which the code will expire in the.
- Click the copy icon next to the backup code to copy it. The code should be sent or conveyed to the user to let them verify their identity without MFA.
- Click Close.

Note:
- If more than one technician creates backup codes for the same user, then the most recently generated code becomes valid and this code can only be used once.


